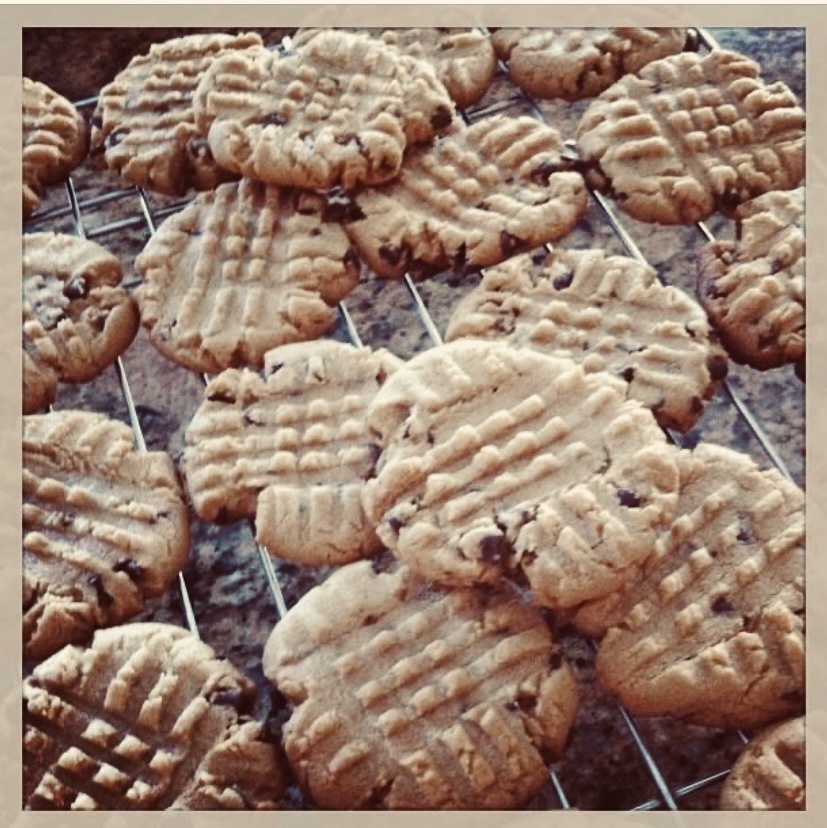
I am a sucker for a peanut butter cookie and this recipe is so easy and sooooo good! These cookies are perfectly soft, peanut buttery, and the ultimate combo of sweet and salty. And to boot, they are gluten free! I honestly don’t really care about that, but some people do. Just thinking of y’all. Three words: MAKE. THESE. TODAY.
RECIPE
1 cup sugar – You can use white or brown sugar or a combination of both.
1 cup peanut butter – I prefer smooth, but chunky will work too!
1 large egg
1 teaspoon vanilla extract
Optional (But not in my house!) – 1/2 cup semi-sweet chocolate chips
INSTRUCTIONS
Preheat oven to 350 degrees F. Line a baking sheet with parchment paper or lightly grease, then set aside.
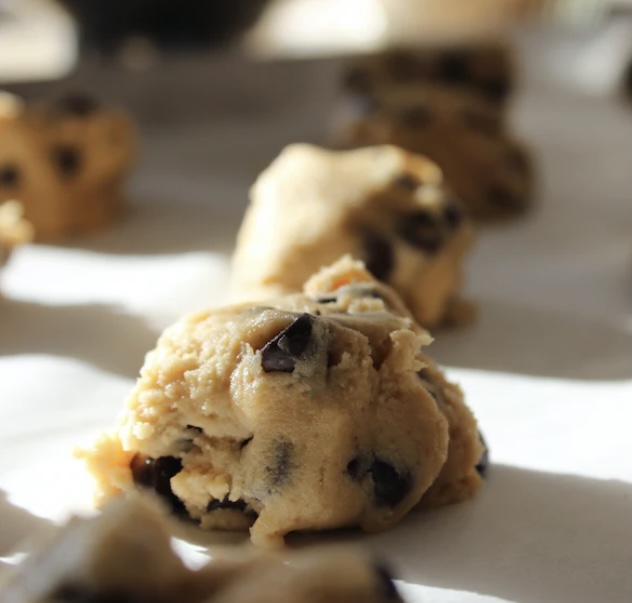
Put all ingredients in a mixing bowl and use a stand mixer or hand mixer to thoroughly combine. Batter might be a little crumbly – that’s okay.
Scoop out dough in tablespoon amounts and roll it between your hands. Place cookie ball on prepared baking sheet. Using a fork, gently press a criss-cross pattern in the dough. Place cookies about 2 inches apart on the baking sheet.
Bake cookies for about 10 to 12 minutes and let rest on the baking sheet for another 5-10 minutes. Transfer to a wire rack to cool completely. ENJOY!
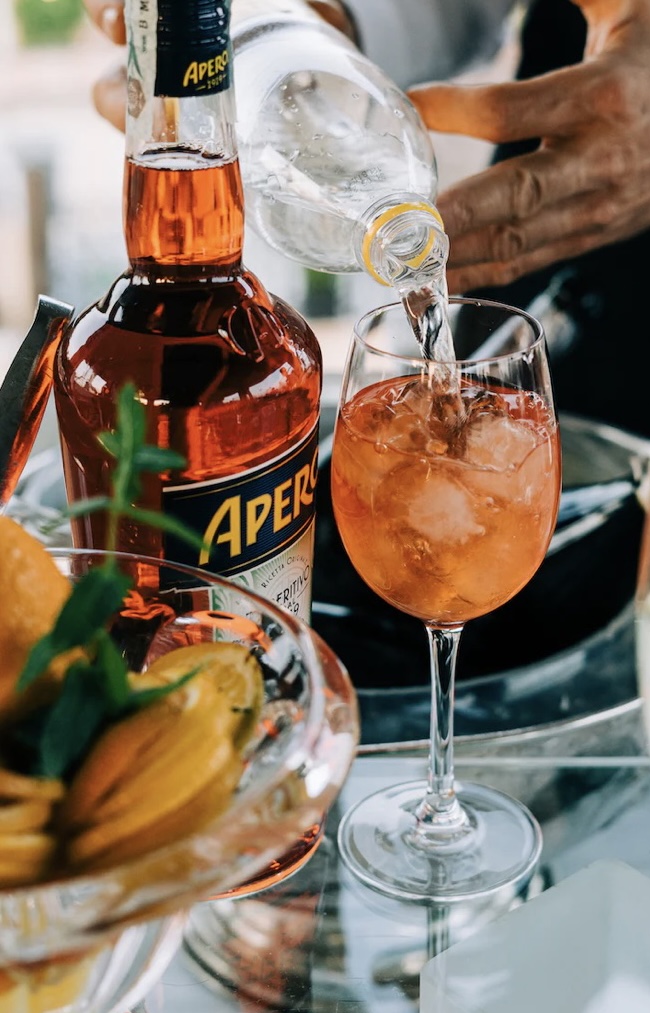
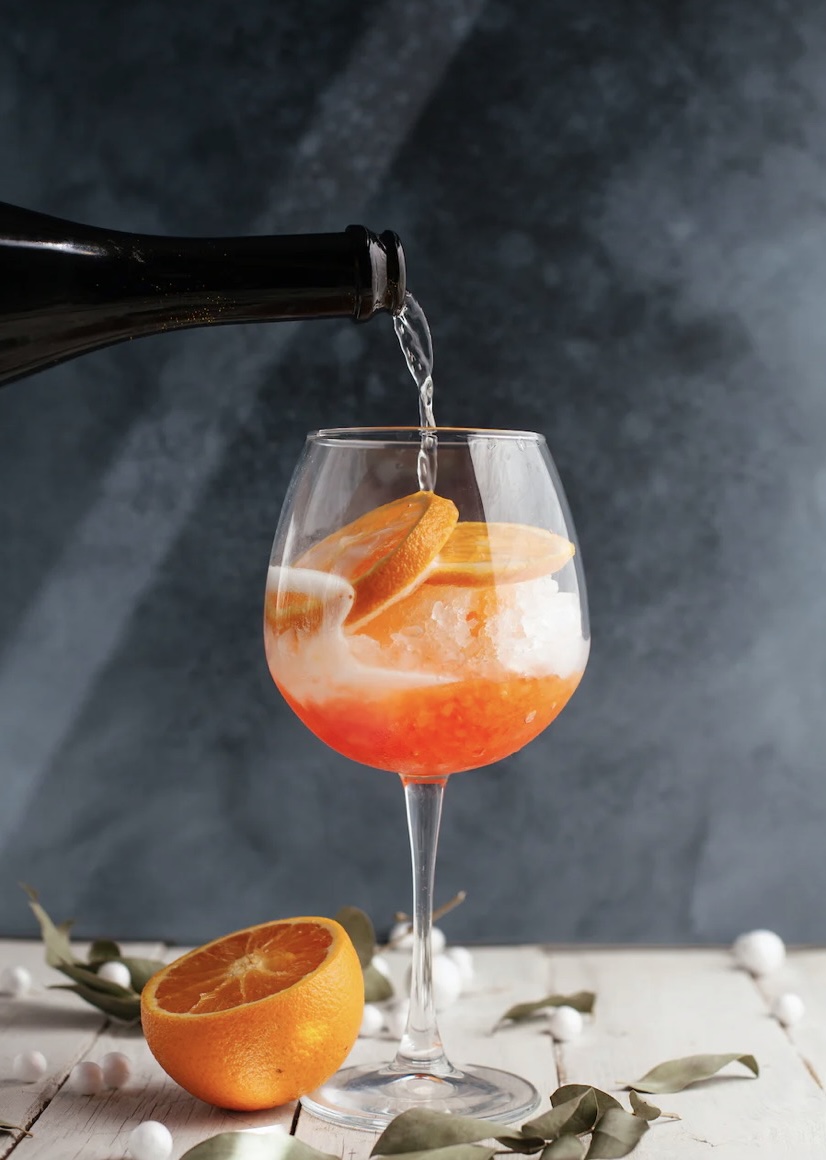
Just recently, I had my first Aperol spritz. I know, I know….I’m a little behind the times. All I can say is that I wish I would’ve discovered this delightful concoction sooner! For someone that loves Prosecco as much as I do, it is a wonder that this spritz and I hadn’t met before now.
Why an Aperol spritzer? Well, it is a classic Italian cocktail. It is refreshing. It is sunshine in a glass. It is insanely simple to make. So, for your next gathering (or just a Tuesday afternoon)….add a little Aperol!
What is Aperol? Aperol is a liquor that was created in 1919 by two Italian brothers, Luigi and Silvio Barbieri. The original recipe (over 100 years old!) is still used today and remains a secret. The beautiful orange-red hue comes from the addition of bitter and sweet oranges, as well as rhubarb. The taste is slightly bitter and sweet all at the same time, which makes it a perfect liquor to mix with other ingredients.
An Aperol spritz is the perfect aperitif. Aperol actually derives it’s name from the french term – aperitif. What is an aperitif you ask? It is a light cocktail that is served before a meal and commonly stimulates the appetite. So, it is indeed the perfect libation for cocktail hour. Due to the bitter notes in Aperol, salty and sweet snacks are perfect companions. I recommend olives, mild cheeses (such as goat or burrata), fruit and nuts.
Make this drink tonight!
The Original Aperol Spritz
Ingredients
Equal parts Aperol Equal parts Prosecco Splash of Club Soda
Instructions
Mix all ingredients in a large wine glass with ice and gently stir. Garnish with an orange slice. To make a “Venetian” spritz, you can also garnish with a green olive.
TIPS: For a sweeter drink, use more Prosecco. If you want more bitterness, use more Aperol. For a stronger drink, omit the club soda. If you want a lighter alcoholic drink, use more club soda or substitute club soda for Prosecco.
A charcuterie board is the perfect choice for casual entertaining. Works as beautifully at at BBQ as it does for the start to an elegant formal dinner. It can stand alone at a cocktail party and it is always sure to be a crowd pleaser. Charcuterie boards have been a trend for quite some time, so if you haven’t attempted to build one…It is now time! Just in case you are friends with Ms. Suzy Charcuterie, who intimidates us with her cheese and cracker skills, I’m here to set your mind at ease that you too can create a beautiful, edible display that will impress your guests.
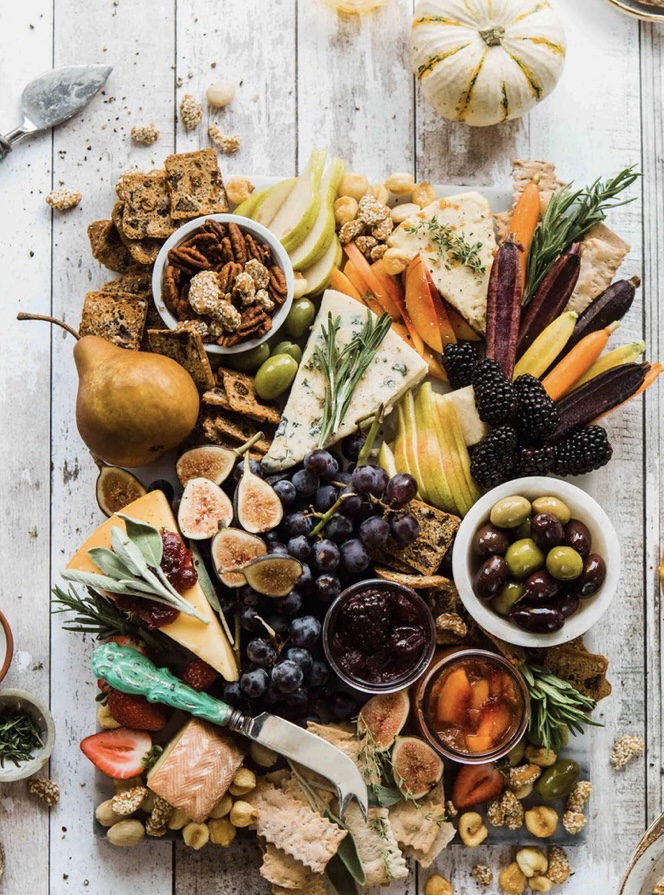
Gorgeous Autumn themed board!
Now….let’s not make this too complicated. Follow these simple guidelines and you will have yourself one beautiful board for your next gathering!
CHOOSE A BOARD
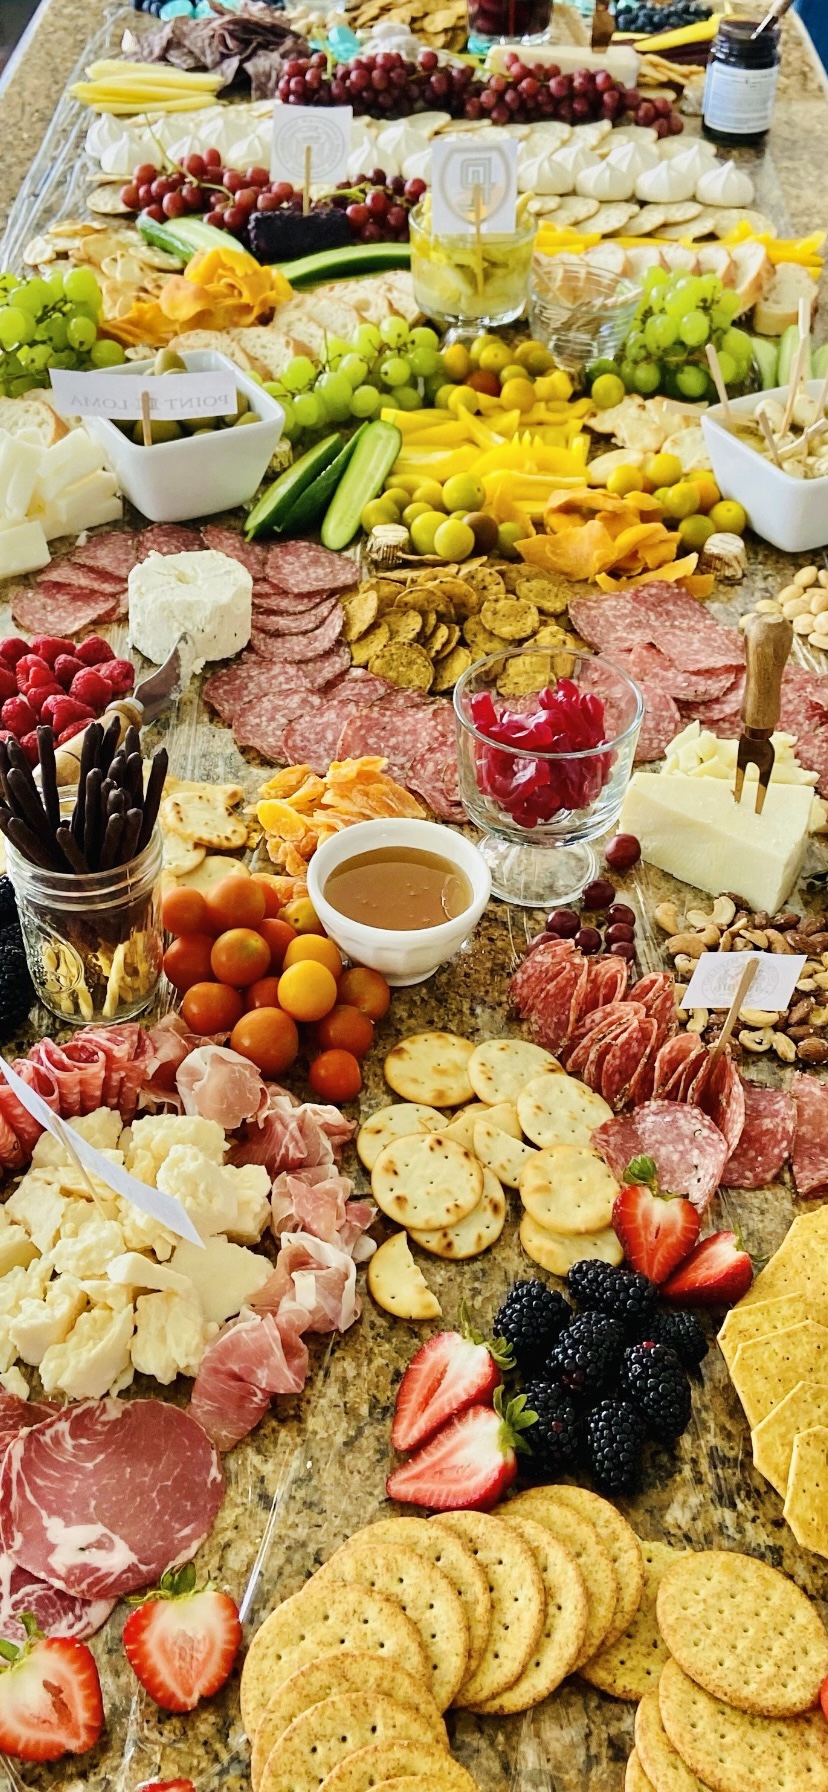
It’s not called a board for nothing! Traditionally, a wooden board is the vehicle for all that deliciousness. However, I have used everything from a lazy susan, a turkey platter, or a large ceramic platter of any shape. I have also used my entire kitchen island to display all the charcuterie goodness (see photo below). A vintage silver tray would be gorgeous. My favorite is a hand carved wooden board that my best friend’s husband made for me. You don’t need to buy anything special…chances are you have something in your kitchen that will work. However, there is a plethora of boards available through sites such as Amazon, Etsy, West Elm, and even Hobby Lobby.
This 10-foot kitchen island was a spectacular “board” for the charcuterie served at my daughter’s graduation party!
CHOOSE THE INGREDIENTS
There are endless options for ingredients, but you can keep it simple. You do not have to make it complicated, unless you want to! Here’s a formula for a successful charcuterie board every time. If you are making a simpler, smaller board you can cut the quantities and variety of these ingredients in half.
*3-4 types of Cheeses – a combination of soft and hard cheeses is best.
*2-3 types of Meats – salami, prosciutto, ham, and pepperoni are good choices. You can find pre-sliced assorted meats in the deli section of your grocery store.
*2 types of Crackers – instead of crackers you can use bread slices, bread sticks or pita chips
*3-4 Condiments – items such as olives, nuts, raw vegetables, dried fruits, jellies, jams and honey
*1-2 Fruits – grapes, berries, apples, pears, figs, and oranges are all great options and will add beautiful color to your board
ARRANGING YOUR BOARD
When arranging your board place the cheeses first, then the meats and then fill in the gaps with everything else. See my “Tips & Tricks” for more guidelines on arranging your charcuterie board. Channel your inner artist and have fun with it! Trust me, you really can’t mess this up and your guests are sure to love whatever you put together for them. And if they don’t? Well, that may be the last invite they get, right?
OTHER TIPS & TRICKS
-Imitation is the best form of flattery. Find a picture of a charcuterie board and copy it! You don’t have to go any further than this post to find some inspirational photos.
-Use little bowls to contain nuts, olives and crackers. You’ll also want a bowl on the side for any discarded items such as olive pits or toothpicks. Place a toothpick and a pit in the bowl, so that guests know that it is trash and don’t confuse olive pits for pistachios. This happened at one of my parties….true story.
-Although a charcuterie board is meant for mainly finger foods, make sure that you do have some cheese knives, and small forks or toothpicks for picking up some items.
-Buy a pre-made meat and cheese tray and rearrange it on your own board. Add some nuts, fruits and crackers and you’re good to go. This is a great time saver and no one will ever know that you took a shortcut!
-Choose bright colored fruits and vegetables for the most visual impact such as strawberries, oranges, yellow peppers, and green sugar snap peas.
-Charcuterie boards are not limited to savory items only. Feel free to add in sweets such as chocolate or cookies. Or, make a dessert charcuterie board made entirely of sweet treats!
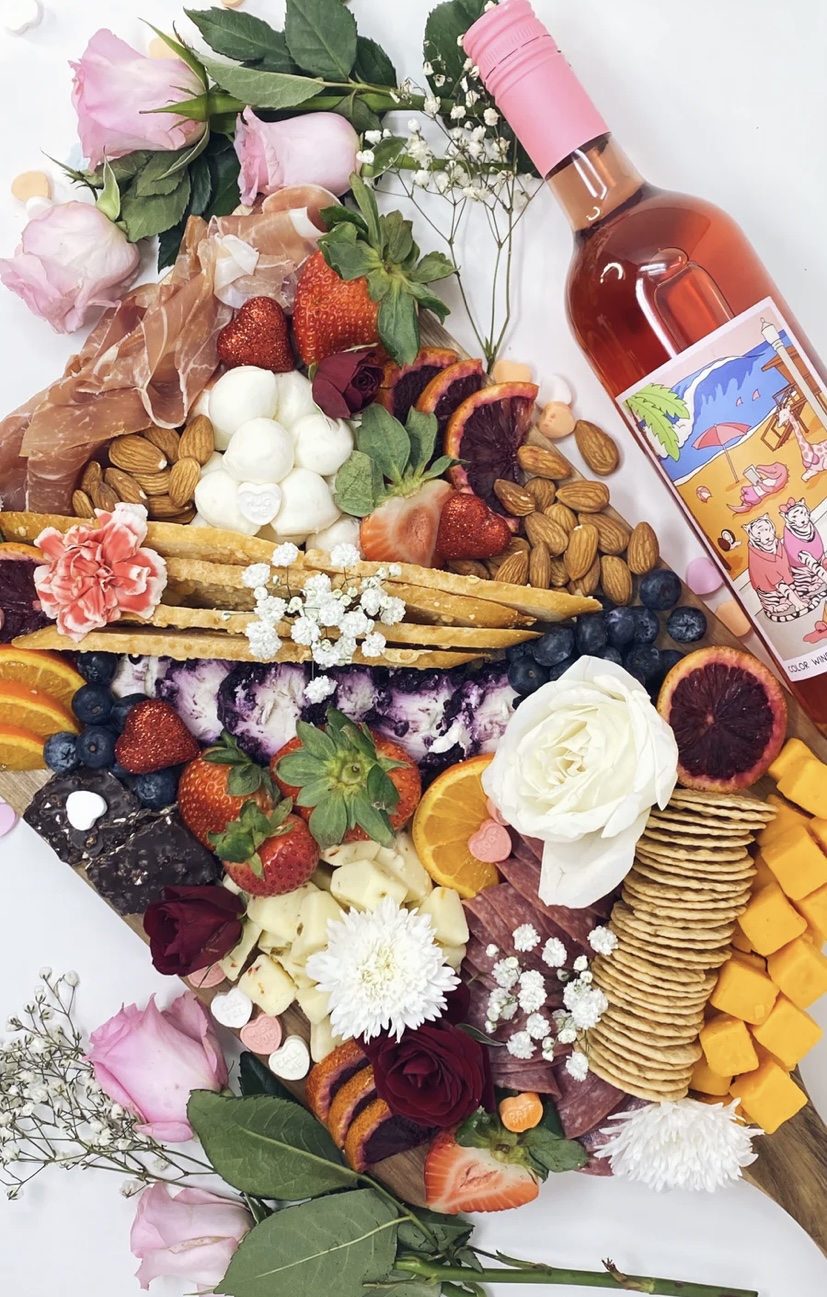
-Use flowers or herbs to enhance your board visually as shown in the picture below. Just make sure you choose flowers that are safe if touching food. And, of course, WINE!
No two boards are alike and that is part of the fun – creating a new charcuterie combination every time! The possibilities are endless, so enjoy the fruits of your labor.
Baking can be intimidating, but I’m here to help you out a bit. True bakers might snub their nose at using cake mixes, but the reality is that many bakeries use them. There are so many benefits to use cake mixes including convenience, consistency and saving time. Baking from cake mixes will generally yield a moister cake that will stay fresh longer. And, as a busy lady, time savers are life savers for me!
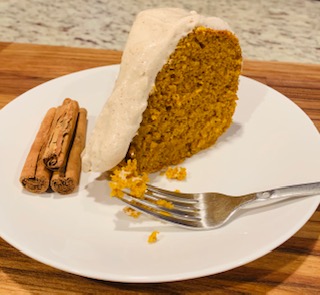
There are so many desserts you can make with a cake mix as a starter; cakes, sweet breads and bar cookies, just to name a few. The trick is to “doctor” the cake mix with some other ingredients to enhance the flavor and texture. And always…ALWAYS…make your frosting from scratch. That’s non-negotiable. Here’s a recipe I recently created using a cake mix to make a scrumptious pumpkin spice bundt cake.
Pumpkin Spice Bundt Cake with Cinnamon Cream Cheese Frosting
1 spice cake mix
1 can 100% pure pumpkin (not pumpkin pie filling)
1/2 cup vegetable oil
1/4 cup water
4 eggs
1 ½ tsp allspice or pumpkin pie spice
1 tsp cinnamon
Frosting:
6 oz. cream cheese
1 cup confectioners sugar
2-3 tbsp milk
1 tsp cinnamon
Preheat oven to 350 degrees.
Generously spray a 8-10 inch bundt pan with non-stick cooking spray. (I love my silicone pan!)
Combine all cake ingredients together and mix with a hand mixer until well blended.
Pour batter into bundt pan and bake for 50 minutes.
Test to see if toothpick or skewer comes out clean.
Allow to cool 15-20 minutes. Transfer to a cake plate and allow to cool for 20 more minutes before frosting.
Although this cake is delectable entirely on it’s own, I recommend frosting it! You could eat this frosting by the spoonful!
Combine all frosting ingredients and mix with a hand mixer until smooth and creamy.
Sifting the sugar can help with eliminating lumps.
Frost cake by spooning the frosting over the top of the bundt and letting it run over the sides. Yum!
I’m new to this blogging thing, so bear with me. I’ve been thinking about this venture for a good 2-3 years and actually set up the website last summer and now I’m finally up and running and excited! Let’s do this!
Now, a little bit about me….I’m a wife, mother, friend, teacher and hostess. I am most happy when I have people I love in my home sharing food, wine, laughs and good conversation. Over the years, I have realized that the traditional dinner party has fallen by the wayside and people just don’t do it anymore. Or, they don’t know how to do it. Or it makes them nervous. Sad. I’m hoping this blog can ease those anxieties a bit and give some fun ideas to entertain at home. It’s the best way I know to bless and serve others and I promise you will be blessed too. So, back to being a hostess….I’m a whoopsie-daisy hostess, which means it’s ok to make mistakes and life will still go on even if you burn the soup or break a glass. It means you’re human. I’ve learned to laugh at myself. It’s not a good party unless at least one glass is broken, right? Right. Probably more like 3 or 4.
Did I mention I love a good dinner party? Who doesn’t? And your friends and family will LOVE it too! So, stayed tuned for monthly posts of ideas for your next dinner party. Until then, here are some tips for being a hostess with the mostess that I have learned over the years.
Start by inviting your friends over – be the house that everyone wants to come to….and don’t be afraid to have a spontaneous get-together.
Don’t be afraid to use the good china and good silver – it’s meant to be used – every occasion can be a special occasion
Let people bring something….or not.
Flowers, candles and good wine….enough said.
A clean toilet is good
Pick a theme – it’s easier to plan a menu and decor if you have a theme. It could be as simple as a color (I love to have color themes for my dinner parties…right down to the food we are eating…more on that later) or a certain culture or cuisine.
Do not let your guests do the dishes….that can wait.
A signature cocktail is always fun and impressive as guests arrive – see recipe below of one of my favorite cocktails.
Semi-homemade and prepare ahead dishes are key to you enjoying your own party!
RELAX! Your guests will take their cue from you…if you are relaxed, they will be too. This cocktail will help:)
Blueberry Mojito (For those who like to muddle)
2 oz. white rum or vodka
1 oz. freshly squeezed lime juice – you can substitute store-bought juice in a pinch
1/2 oz. sugar syrup (boil 2 parts sugar to 1 part water until syrupy or you can buy simple syrup ready to go)
mint leaves
blueberries
club soda
Pour sugar syrup into a tall glass and add a few leaves of mint; gently muddle. Add 8-10 blueberries and continue to muddle. Add rum and lime juice and stir well. Top with ice and stir. Fill with club soda and top with blueberries. Cheers!